

Getting your WordPress site SEO-ready can feel overwhelming, especially when setting up plugins like Yoast SEO for the first time. This beginner-friendly guide walks through the entire initial setup process, including pre-installation steps, navigating the configuration wizard, choosing safe default settings, and essential first optimizations to boost search engine visibility from day one.
Note on screenshots: WordPress and Yoast screens can vary slightly by version and by whether you’re using the classic editor or the block editor. As you follow along, take screenshots of your own admin screens at each step (we’ve included clear “Screenshot:” prompts so you know exactly what to capture).
What to Expect from Yoast SEO Configuration
Yoast SEO’s initial setup is designed to prevent common SEO mistakes, generate helpful defaults, and turn on key technical features (like XML sitemaps) without requiring you to know code. After configuration, you should have:

Basic site identity set (site type, organization/person, logo/social profiles where applicable).
XML sitemaps enabled so search engines can discover your important URLs.
Reasonable search appearance defaults so you don’t accidentally index thin or duplicate pages.
A working workflow for optimizing each post/page using the Yoast sidebar (focus keyphrase, title, meta description, readability checks).
Before You Begin: Pre-Installation Checklist
Before installing any SEO plugin, do these quick checks so your settings don’t fight each other later.
1) Confirm your site is visible to search engines
In WordPress, go to Settings → Reading and make sure “Discourage search engines from indexing this site” is unchecked.
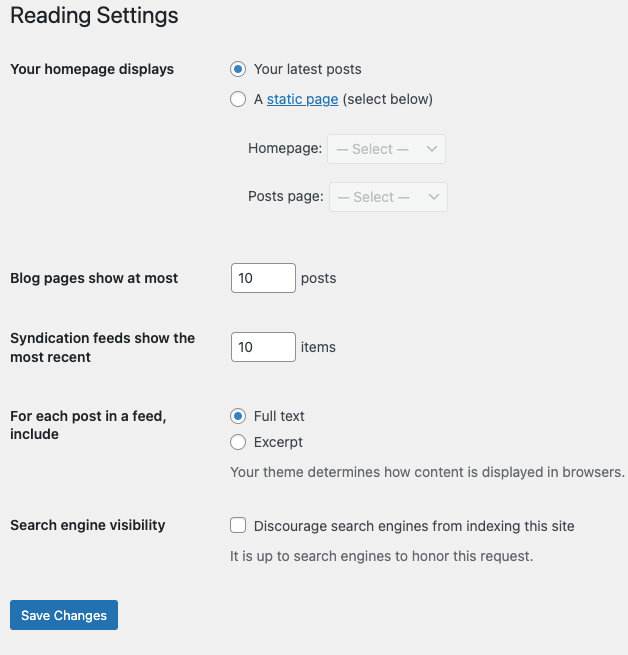
Screenshot: Settings → Reading showing the Search engine visibility option.
2) Decide your preferred URL format (www vs non-www)
Pick one and stick with it. In Settings → General, confirm your WordPress Address (URL) and Site Address (URL) are correct and match the format you want to keep long-term.

Screenshot: Settings → General showing the WordPress Address and Site Address fields.
3) Avoid running multiple SEO plugins
If you already have another SEO plugin active, decide which one you’ll use and deactivate the other before configuring Yoast. Running multiple SEO plugins can create conflicting titles, meta tags, and sitemap issues.
4) Collect your basic brand details
Have these ready so the wizard is fast:
Your site name and tagline.
Whether your site represents an organization or a person.
Your logo image (ideally a square version) and a featured “social sharing” image you’re comfortable using as a default.
Installing Yoast SEO Plugin
In your WordPress dashboard, go to Plugins → Add New, search for “Yoast SEO,” then click Install Now and Activate.
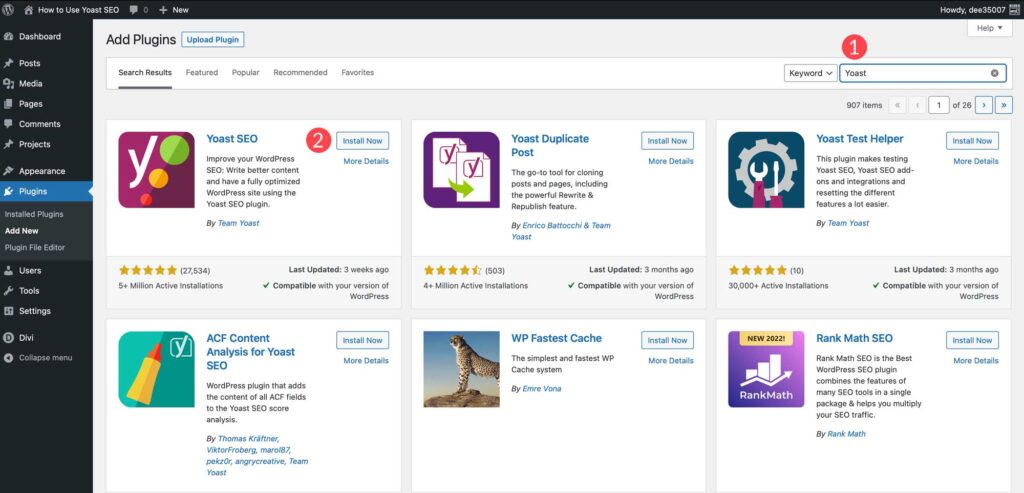
Screenshot: Plugins → Add New search results highlighting Yoast SEO, with the Install/Activate buttons visible.
If you’re migrating from another SEO plugin, Yoast may offer an import flow. Only import once you’ve decided to fully switch, and review the results carefully afterward.
Step-by-Step Configuration Wizard Walkthrough
After activation, look for the new Yoast SEO menu item in your WordPress admin sidebar. Most first-time setups can be completed via Yoast’s configuration flow and then refined in Settings.
Step 1: Start the first-time configuration
Open Yoast SEO and find the prompt to start the configuration or “first-time configuration.” If you don’t see it immediately, check the Yoast SEO dashboard for a setup banner.
Screenshot: Yoast SEO dashboard showing the first-time configuration prompt.
Step 2: Site representation (person vs organization)
Select whether the site represents a person or an organization. This helps search engines understand your site’s identity, and it can affect how your site appears in search results.
If you choose Organization, add your organization name and logo. If you choose Person, select the user profile that represents the site (and make sure that profile has a clear display name).
Screenshot: Wizard screen for “Site representation” (person/organization), showing fields for name and logo.
Step 3: Social profiles (optional but recommended)
Add the social profiles that match your brand. This can help with consistency and may support how your brand is understood across the web. Only add profiles you actively maintain.
Screenshot: Wizard screen showing social profile URL fields.
Step 4: Search visibility choices (what to show in search)
The wizard may ask about search visibility for different content types. For most beginner sites, the safest approach is:
Posts and Pages: visible in search (index).
Media attachments: avoid indexing thin attachment pages if your theme creates them (many sites don’t benefit from these being indexed). If Yoast provides a “redirect attachment URLs” option, enabling it is often a good default because it helps prevent low-value pages from being indexed.
Screenshot: Wizard screen for search visibility/content types.
Step 5: Multiple authors setting
If you are the only writer, tell Yoast it’s a single-author site when asked. This can help avoid creating unnecessary author archive pages that might be thin on content. If you run a multi-author blog, choose the multi-author option so those archives can remain useful and intentional.
Screenshot: Wizard screen asking whether your site has multiple authors.
Step 6: Title settings and separators
Yoast may ask you to choose how your SEO titles look (often including a title separator like a dash). Choose the format that matches your brand. A common beginner pattern is: Page/Post title, then the site name.
Screenshot: Wizard screen for title settings and title separator.
Step 7: Finish and save
Complete the wizard and save changes. After this, you’ll refine the most important settings in the Yoast SEO settings screens.
Optimizing Your Site Settings
Once the wizard is complete, go to Yoast SEO → Settings (or the equivalent settings area in your version) and review these items carefully.
Set your SEO title and meta description defaults
Yoast can auto-generate SEO titles and meta descriptions, but for important pages (homepage, services, core landing pages), we recommend writing them manually.
Homepage: Make sure your homepage has a clear SEO title and meta description that describes what you do and who you serve.
Posts: Ensure your post title template makes sense and includes your site name.
Screenshot: Search appearance/title templates screen (or equivalent) showing default templates.
Control what gets indexed
Index the pages that should rank. Consider noindexing archives that don’t add value (for example, empty tag archives). This is a “less is more” area for many new sites: keep search engines focused on your best content.
Connect your site to Google Search Console (optional but recommended)
If your Yoast version includes a “site connections” area, add your search engine verification codes there. This helps you verify ownership and view indexing and performance data later. If your version doesn’t include this section, you can still verify via your SEO plugin, a dedicated verification plugin, or your theme settings.
Screenshot: Site connections/verification screen (if present), showing fields for verification codes.
Set breadcrumbs (optional)
Yoast can generate breadcrumbs, but it typically requires theme support or a small theme edit. If you’re a beginner and your theme doesn’t already support Yoast breadcrumbs, it’s okay to skip this initially and revisit later.
Configuring XML Sitemaps and Search Appearance
Yoast’s XML sitemap helps search engines discover your content efficiently. Confirm that sitemaps are enabled and that the sitemap includes the content types you want indexed.
Verify your sitemap is working
In the Yoast settings, find the XML sitemap section. Use the provided sitemap link to confirm it loads. If the link errors, a caching/security plugin may be blocking it, or another plugin may be generating a sitemap.
Screenshot: Yoast XML sitemap settings with the sitemap link visible.
Review search appearance by content type
Check that Posts and Pages show in search results. For other content types, only enable indexing if they’re truly valuable as standalone pages (for example, a “Projects” custom post type might be great to index; a thin “Testimonials” type might not be).
Screenshot: Search appearance settings showing toggles for content types and “Show in search results.”
| Site area | Recommended beginner approach |
|---|---|
| Posts | Index (show in search results) |
| Pages | Index (show in search results) |
| Categories | Index if you plan to use categories intentionally and add enough posts per category |
| Tags | Often noindex for new sites unless tags are curated and have unique value |
| Media attachment pages | Avoid indexing thin attachment pages; redirect attachment URLs if available |
| Author archives | Single-author sites often benefit from disabling/noindexing author archives |
Common Configuration Mistakes to Avoid
Mistake 1: “Discourage search engines” left enabled
If you built your site in private mode and forgot to turn it off, your SEO work won’t matter. Double-check Settings → Reading.
Mistake 2: Indexing thin pages (tags, author archives, attachment pages)
New sites often create lots of low-value URLs by default. Keep your index clean: only index what you want people to land on from Google.
Mistake 3: Writing one meta description for every post, forever
Not every post needs a custom meta description on day one. Prioritize your key pages and top traffic posts first, then iterate.
Mistake 4: Chasing “green lights” instead of clarity
Yoast’s checks are helpful, but they’re not the goal. The goal is clear structure, helpful content, and titles that match what people search for.
Mistake 5: Forgetting to optimize site basics
SEO is more than plugin settings. Make sure your site has a clear navigation, fast loading pages, and at least a few strong foundational pages (Home, About, Contact, and your core offerings).
Frequently Asked Questions
Do I need Yoast SEO Premium to be SEO-ready?
No. Many new WordPress sites can get excellent results with the free version, as long as the basics are configured correctly and you publish high-quality content consistently.
Should I set a focus keyphrase for every page?
It’s helpful for important pages, but it’s not required for every URL. Start with your homepage and your most important landing pages, then optimize posts as you publish them.
Why is my sitemap not showing or returning an error?
Common causes include caching/security plugins, server rules, or another plugin already outputting a sitemap. Temporarily disable conflicting features and re-check. If you’re unsure, your host or a developer can help diagnose quickly.
What pages should I noindex as a beginner?
If you’re not intentionally using tag archives or author archives, those are common candidates. Also consider avoiding indexed media attachment pages if they’re thin. When in doubt, keep it simple: index your main content and skip the rest until you have a reason.
How do I use Yoast inside the WordPress editor?
Edit a post or page and look for the Yoast panel (often in the sidebar). Start by writing your content, then adjust the SEO title, meta description, and keyphrase. Use the readability suggestions as a final polish, not as a strict checklist.
Next Steps After Configuration
After you finish setup, here are the first optimization tasks we recommend:
Optimize your homepage SEO title and meta description, and make sure your homepage clearly explains what your site offers.
Create or refine your core pages (About, Contact, and your main services/products) and give each a unique SEO title and meta description.
Pick one content topic you can realistically publish about, then commit to consistent posting. SEO is cumulative.
Submit your sitemap in Google Search Console once your site is verified, and check back for indexing status and coverage issues.
If you’re using our tools, we also recommend reading Getting Started with ClearPost WordPress Plugin to speed up your content workflow while keeping posts structured for the block editor.
[cta] Ready to get your site SEO-ready and publish consistently? At ClearPost, we can help you turn your content plan into clean, well-structured drafts you can optimize in Yoast and publish with confidence. Start by setting up your SEO basics, then focus on a steady publishing cadence.
Install ClearPost free on WordPress.org. Set up in 2 minutes, approve every post before it goes live.
Yoast SEO vs AIOSEO: Which Should Beginners Choose?
Both Yoast SEO and AIOSEO (All in One SEO) are solid WordPress SEO plugins, and either one can handle the fundamentals. The right choice depends on your priorities and how much you want to configure upfront. Here is how they compare on the features that matter most to beginners.
| Feature | Yoast SEO (Free) | AIOSEO (Free) |
|---|---|---|
| Setup wizard | Step-by-step, 7 screens | Guided wizard with site category presets |
| Readability analysis | Built-in (Flesch score, sentence length, passive voice) | Available in paid TruSEO only |
| Schema markup | Basic (Organization/Person) in free; full schema types in Premium ($99/yr) | 6+ schema types in free tier |
| Redirect manager | Premium only ($99/yr) | Pro tier only ($49.60/yr) |
| Breadcrumbs | Free (requires theme support or shortcode) | Free (block or shortcode) |
| Social previews | Free (Facebook and X/Twitter) | Free (Facebook and X/Twitter) |
| Performance impact | ~0.3-0.5s added to admin page loads; minimal frontend | Similar; slightly lighter admin UI |
| UI complexity | More settings screens, deeper menus | Flatter navigation, fewer sub-pages |
Choose Yoast if you want readability scoring in the free tier, you follow WordPress tutorials that reference Yoast (most do), or you plan to use Yoast Academy’s free courses to learn SEO alongside the plugin.
Choose AIOSEO if you need more schema types without paying, you prefer a simpler settings layout, or your budget for premium features is under $50/year. Read our full AIOSEO review for a deeper breakdown.
Either way, the plugin is only 20% of the work. Consistent publishing, good internal linking, and covering topics thoroughly matter far more than which SEO plugin you pick. For a broader comparison of what is available, see our guide to the best automated SEO tools for WordPress.
Common Yoast Setup Mistakes That Hurt Rankings
Getting through the wizard is step one. These are the post-setup mistakes that quietly hold sites back for months.
1. Leaving auto-generated meta descriptions on key pages
Yoast pulls the first ~155 characters of your content as a fallback meta description. On your homepage, service pages, and top posts, that fallback is almost always a generic intro sentence that does not compel clicks. Write a specific meta description for any page you want to rank. Include the target keyword and a reason to click. Pages with custom meta descriptions average 5.8% higher CTR than auto-generated ones according to Ahrefs data.
2. Ignoring the readability analysis entirely
The readability tab is not just a style checker. Yoast flags paragraphs over 150 words, sentences over 20 words, and excessive passive voice. These directly affect how long visitors stay on the page. Google measures engagement signals. If your content reads like an academic paper, visitors bounce, and rankings stall. You do not need a perfect green score, but consistently red readability signals mean your content is harder to consume than competitors.
3. Using the wrong permalink structure
WordPress defaults to ?p=123 style URLs. Many beginners change this to “Day and name” or “Month and name” because they seem descriptive. Both add date segments that make evergreen content look outdated. Set your permalinks to “Post name” (/%postname%/) under Settings > Permalinks. This gives you clean, keyword-friendly URLs. Change this before you publish content — changing permalinks later breaks existing links unless you set up redirects for every URL.
4. Skipping social preview configuration
When someone shares your post on Facebook, LinkedIn, or X, the platform pulls the Open Graph image and description. If you have not set a default sharing image in Yoast (under Social settings) and have not added images to individual posts, your shared links show up with a generic placeholder or a random image pulled from the page. This cuts social click-through rates significantly. Set a default Open Graph image in Yoast’s social settings, and add a specific image when editing important posts.
5. Not submitting your sitemap to Google Search Console
Yoast generates an XML sitemap automatically, but Google does not know it exists unless you submit it. Go to Google Search Console > Sitemaps and enter your sitemap URL (usually yourdomain.com/sitemap_index.xml). Without this step, Google relies on crawling alone to discover new pages, which can delay indexing by days or weeks — especially on new sites with few backlinks.
6. Choosing the wrong Organization vs Person schema
During setup, Yoast asks whether your site represents a person or an organization. If you run a business but select “Person,” Google may not generate a Knowledge Panel for your brand. If you are a solo consultant or blogger but select “Organization,” you miss out on personal brand signals. The rule: if customers hire your company name, choose Organization. If they hire you by name, choose Person. You can change this later in Yoast > Settings > Site Representation, but do it early so your schema is consistent from the start.
What to Do After Yoast Setup: Your First 30 Days
Setup is done. Now the real SEO work starts. Here is a week-by-week plan to build momentum in your first month.
Week 1: Publish 3 cornerstone articles
Pick the 3 topics most central to your business and write a thorough article on each (1,500+ words). In Yoast, mark each as “Cornerstone content” so the plugin holds them to a higher optimization standard. These are the pages you want Google to treat as your most important. Give each a custom SEO title, meta description, and focus keyphrase. If writing that volume of content feels overwhelming, AI content writing plugins can help you produce structured first drafts faster, though you should always edit for accuracy and voice.
Week 2: Build internal links between your content
Go through every published post and page. Link related content to each other using descriptive anchor text (not “click here”). Your 3 cornerstone articles should receive the most internal links. Yoast Premium has an internal linking suggestion tool, but the free version works fine if you do it manually. Aim for at least 2-3 internal links per post. Internal links help Google understand your site structure and distribute page authority to your most important content.
Week 3: Audit Google Search Console for crawl issues
By now, Google should have started crawling your sitemap. Log into Google Search Console and check the Pages report (previously called Coverage). Look for pages with errors or pages marked “Excluded.” Common issues at this stage: pages blocked by robots.txt, redirect loops, and soft 404s. Fix anything flagged as an error. For “Excluded” pages, verify that the excluded URLs are ones you intentionally noindexed (like tag archives). If important pages are excluded, investigate why.
Week 4: Review impressions and plan your next content
Open Search Console > Performance and filter to the last 28 days. Look at which queries your site is appearing for and which pages get impressions. You will likely see low positions (30-60) for your target keywords. That is normal for a new site. The data tells you which topics Google associates with your site. Double down on the topics where you are already getting impressions: write supporting articles, add depth to existing posts, and strengthen internal links. For pages getting impressions but zero clicks, rewrite the SEO title to be more specific and compelling — this is where AI content and SEO data becomes useful for testing what works.
Frequently Asked Questions About Yoast SEO Setup
Is Yoast SEO free good enough for beginners?
Yes. The free version includes XML sitemaps, meta title/description control, readability analysis, basic schema markup, Open Graph tags, and the configuration wizard. The main features locked behind Premium ($99/year) are the redirect manager, internal linking suggestions, and multiple focus keyphrases per post. Most beginners will not need those in their first 6 months. Invest in content quality first and upgrade when you have enough traffic to justify the cost.
Does Yoast slow down WordPress?
Yoast adds roughly 0.3-0.5 seconds to WordPress admin page loads because it runs content analysis in real time as you edit. On the frontend (what visitors see), the impact is minimal — Yoast primarily outputs meta tags in the HTML head, which adds negligible load time. If you notice significant slowdowns, the cause is more likely your hosting, theme, or other plugins. Run a speed test with GTmetrix or PageSpeed Insights before and after activating Yoast to measure the actual difference on your site.
Can I use Yoast with a page builder like Elementor?
Yes, but with a caveat. Yoast reads the content in the WordPress editor to run its analysis. Page builders like Elementor, Divi, and Beaver Builder render content differently, so Yoast’s content analysis may not detect all your text. The SEO title, meta description, and schema settings still work correctly regardless of which builder you use. For the most accurate readability and keyphrase analysis, add your focus keyphrase and review the Yoast panel after saving your Elementor layout.
How long does Yoast take to affect rankings?
Yoast itself does not directly change your rankings. It helps you configure technical SEO correctly and optimize content, but Google still needs to crawl, index, and evaluate your pages. Expect 2-4 weeks for Google to recrawl pages after you update titles and meta descriptions. For new content, ranking improvements typically take 3-6 months as Google assesses quality signals. If you are on a brand new domain with no backlinks, the timeline is longer. Yoast accelerates the process by making sure you are not blocking yourself with technical mistakes.
Should I switch from Yoast to AIOSEO?
Only if Yoast is missing a feature you specifically need and AIOSEO offers it in a cheaper tier. Switching SEO plugins mid-stream risks losing custom meta descriptions, breaking redirects, and resetting schema markup. Both AIOSEO and Yoast offer migration tools, but migrations are never perfectly clean. If your site is already configured and working in Yoast, the switching cost almost never justifies the benefit. If you are just starting out and have not published content yet, then compare both and pick one — but commit to it.
Whether you stick with Yoast or explore alternatives, the fastest path to rankings is consistent, well-structured content published on a regular schedule. If you want to automate the content creation side while keeping full editorial control, try ClearPost free — it generates SEO-optimized drafts you review and approve before anything goes live.